
The Sicilian Scheveningen begins with the moves: 1.e4 c5 2.Nf3 d6 3.d4 cxd4 4.Nxd4 Nf6 5.Nc3 e6
Sicilian Scheveningen
This variation of the Sicilian doesn’t owe its name to any particular player, rather a town in Holland where the opening was first played in 1923. The main feature of this defence is the ‘small centre’ that Black possesses: the pawns on e6 and d6. This pair controls many crucial squares in the centre and forms a formidable defensive wall, upon which many overzealous white attacks have been rebuffed.
Black plans classical development with …Be7, …0-0, …Nc6 (or possibly …Nbd7) and the typical queenside counterplay with …a7-a6 and …b7-b5. As in the Najdorf, Black is always on the lookout to play a favourable …d6-d5, liberating his position.
White has many aggressive attempts to break down Black’s super-solid structure and we will be taking a look at the most important ones in this article. One of the main attractions of the Scheveningen Variation is that Black creates no unnecessary pawn weakness and so his structure is basically sound.
Garry Kasparov used the Scheveningen to great effect when he defeated Karpov in their 1985 World Championship Match. Try as he might, Karpov could find no way through the black defences and in the end he even gave up playing 1 e4 against Kasparov.
The Sicilian Scheveningen can be divided into 4 main variations:
- The Keres Attack
- The English Attack
- White Plays Be2
- The Fischer Attack
Scheveningen – The Keres Attack
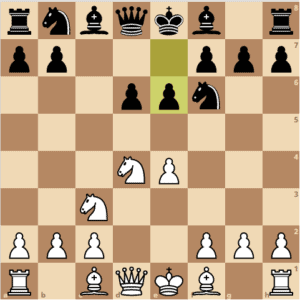
The Keres attack of the Scheveningen begins with: 1.e4 c5 2.Nf3 d6 3.d4 cxd4 4.Nxd4 Nf6 5.Nc3 e6 6.g4
 The Keres Attack is without doubt the most aggressive way to meet the Scheveningen and is a crucial test of the defence’s viability. We’ve already seen the value of the g2-g4 lunge in the Sicilian and the only difference on this occasion is that White plays it as early as move six.
The idea is very straightforward: White wishes to dislodge Black’s defensive knight from its favourite f6-post and claim as much space on the kingside as possible.
6…h6
The most popular response to the Keres Attack. With this move Black stabilises the position of his f6-knight, at least for the moment. It will now take White two more moves to prepare to dislodge it again.
The move 6…d5 is, in a way, logical as it meets the well-known requirement of ‘responding to an attack on the wing by a counter-attack in the centre’. However, it also commits the ‘sin’ of moving a piece (or in this case a pawn) twice in the opening.
This loss of time is the most important factor and it’s White who comes out on top. For example: 7.exd5 Nxd5 8.Bb5+ Bd7 9.Nxd5 exd5 10.Qe2+ Qe7 11.Be3 g6 12.Bxd7+ Nxd7 13.Nb5 Ne5 14.0-0-0 and White was very well placed in Fischer Reshevsky, New York 1967.
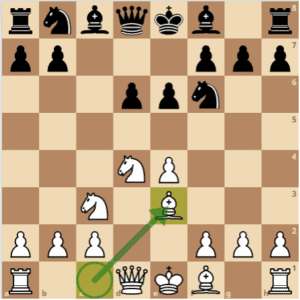
7.h4
More aggression. White continues to prepare the g4-g5 advance. 7…Nc6 Sensibly developing another piece.
8.Rg1
This looks a little strange to begin with, but White’s play is perfectly logical. The immediate 8.g5 is met by 8…hxg5! and the pin on the h-file prevents White from recapturing with the pawn. After 8.Rg1 White can now recapture with the h-pawn so the g4-g5 push carries more weight. Of course, White can no longer castle on the kingside, but given that he has already launched his kingside pawns forward, he was always intending on castling on the other wing.
8…h5!
Black fights back on the kingside. The idea is that after g4-g5 Black can hop his knight into the g4-square. The move 8…h5 is by far Black’s most popular choice.
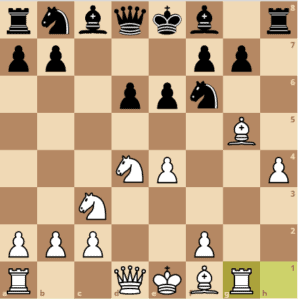
9.gxh5
White changes plan slightly and gives his g1-rook a half-open g-file. 9…Nxh5 10 Bg5 Nf6
Strategies
White has already achieved quite a bit on the kingside. The rook on g1 is on a half-open file and the bishop on g5 is actively placed. White should be looking to complete development and castle queenside before commencing active duties.
With the kingside so open, Black very rarely castles on that side. Instead, he develops his queenside and plans to castle that way too, although on some occasions his king may even feel safer in the centre. Despite White’s early action, Black’s structure is still very sound. If Black can negotiate White’s pressure or swap off into an ending then
his chances of success are greater. For example, White’s isolated pawn ,on h4 may then become more of a burden rather than an attacking unit.
Theory
There is not much particularly theory in the Keres Attack. The Diagram above can veer off into many different variations, but the systems of development are more important than any particular sequence of moves.
Statistics
The Keres Attack is very popular, especially at higher levels, and its success rate is no secret. In Mega Database I found more than 3,000 games with 6 g4, with White scoring an impressive 60%. It’s mainly due to the strength of the Keres Attack that many players with Black now prefer using the Najdorf move order (with 5…a6), avoiding the Keres Attack entirely. Then Black can transpose into Scheveningen after, say, 6.Be2 e6 or 6.Be3 e6. Indeed, this has generally been Garry Kasparov’s preferred move order.
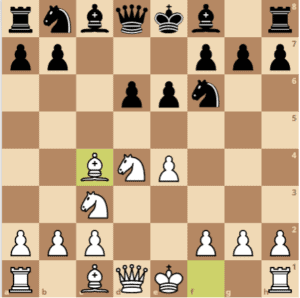
The English Attack
The English Attack of the Scheveningen Variation begins with the moves: 1.e4 c5 2.Nf3 d6 3.d4 cxd4 4.Nxd4 Nf6 5.Nc3 e6 6.Be3
White plays Be3
A typical position in the English Attack. This move order for White can be seen against the Najdorf Defense. White is aiming for pretty much the same sort of stuff: quick development of the queenside, queenside castling and a pawn storm on the kingside.
6...a6
This is Black’s most popular response. He immediately sets queenside operations in motion.
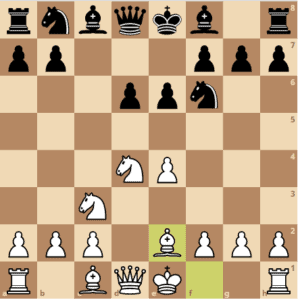
7.Qd2 b5 8.f3
Giving the e-pawn extra support and preparing g2-g4.
8…Nbd7
Black continues to develop on the queenside.
9.g4 h6
As against the Keres Attack, Black slows down White’s play on the kingside with this move. The main alternative for Black is 9…Nb6, vacating the d7-square for the other knight in anticipation of g4-g5.
10.0-0-0 Bb7
Strategies
It’s safe to say that White will once again be concentrating his energies into a kingside offensive. White will want to dislodge the black knight on f6 with g4-g5, and this move will usually require some preparation.
Black will often hit back with …b5-b4, followed by the typical freeing advance …d7-d5. Black’s king may often simply remain in the centre as it’s normally safer there than it would be on the king side. Play is extremely sharp and one slight error can often be enough for a decisive advantage.
Theory
A large body of theory has built up over the last twenty years and it’s advisable, especially for anyone playing Black, to read up before at tempting to play this line in a serious game. That said, the theoretical moves are usually the most logical ones, so playing on general principles can be sufficient in many cases (unlike, say, in the Yugoslav Attack against the Dragon).
Statistics
6.Be3 is now one of the most popular responses to the Scheveningen. One of its appeals is that white players can adopt the same system against both the Najdorf and the Scheveningen, thus cutting down on the number ofsystems to learn. Looking at the positions further down the line, I found just under 500 games from the last diagram in Mega Database. White scores a reasonable 55%, while as many as 75% of the games are decisive.
White Plays Be2 (Classical Variation)
1.e4 c5 2.Nf3 d6 3.d4 cxd4 4.Nxd4 Nf6 5.Nc3 e6 6.Be2
The classical approach.With this move, White plans to develop his pieces and castle kingside before undertaking any active operations.
6…a6
The most popular choice, although Black can also play without this move for the time being, simply continuing with …Be7, …0-0 and …Nc6.
7.0-0 Be7 8.f4
A typical move in the Classical Scheveningen. White gains space on the kingside and some control over the e5-square.
8…0-0
Once again Black could consider delaying castling, but the immediate lunge 8.b5 looks a bit premature. For example: 9.Bf3 Bb7 10.e5! forces 10.Nd5 and 11.Nxd5 Bxd5 12.Bxd5 exd5 13.e6 looks nice for White.
9.Be3 Nc6
9…Qc7, delaying the development of the knight, is also possible, although this very often simply transposes into the main line after 10.a4 Nc6.
10.a4
It’s noticeable that White is generally playing in a more restrained manner than in the Keres or the English Attack. White wants an eventual attack, but a much more controlled one where Black’s counterplay is at a minimum.
10…Qc7 11.Kh1
Once again we see this little king move, played in order to negate various tactics along the gl-a7 diagonal.
Strategies
White is planning on a slow-burning attack on the kingside. There are a few possible ways to carry out the attack, but the most popular procedure involves the plan of g4-g5, once again displacing the crucial defensive knight from f6. White often plays Bf3-g2, clearing the way for the white queen to enter the attack, perhaps via h5, while giving the king on h1 some much needed added protection.
Sometimes White’s rook on fl makes a journey to h3 via f3. This, coupled with the queen on h5, already produces very dangerous threats against the black king. Black has to consider how to both fortify his king’s position and accomplish counterplay in the centre and on the queenside. The first objective is often achieved by some deep and prophylactic defensive measures.
For example, Black can move the rook to e8, play …Bf8, …g7-g6, …Bg7 and finally …Nf6-d7-f8, protecting the crucial h7-pawn. This procedure is quite lengthy but produces an extremely resilient defensive position. More aggressively, Black may play …b7-b6 followed by …Bc8-b7, pointing this bishop along the long diagonal directly opposite White’s king. Black will also be on the lookout for any chance to play a freeing …d6-d5 or …e6-e5 advance.
Theory
In this position plans are more important than any particular moves. Hence, there is not much theory.
Statistics
6.Be2 is still the most popular choice against the Scheveningen. It appeals to players as White seems to keep more control over the proceedings than with, say, the English Attack. It’s less likely that a small error played by either side will be so crucial, as the attacking and defensive plans are longer and more deliberate.
The popularity of the Classical Scheveningen can be gauged by the fact that there were over 2,000 examples in Mega Database. White scores 56%, while 64% of the games are decisive (this is considerably lower than the figure in the English Attack).
Fischer Attack
1.e4 c5 2.Nf3 d6 3.d4 cxd4 4.Nxd4 Nf6 5.Nc3 e6 6.Bc4
White plays 6.Bc4
A typical Fischer Attack position. 6.Bc4 is a huge favourite of Bobby Fischer’s and has also been played by the likes of Garry Kasparov and Nigel Short (against Garry Kasparov!). The king’s bishop is aggressively placed on c4. Although it has to be said that at the moment the pawn on e6 does a very good job of blunting its power.
However, on the a2-g8 diagonal the bishop dissuades Black from playing either …d6-d5 or …e6-e5, both of which would certainly bring the bishop to life.
6…a6
It should be noted that this position often arises out of the Najdorf move order 5…a6 6 Bc4 e6.
7.Bb3
A prophylactic measure against both …d6-d5 and the impending …b7-b5.
7…b5
Black seeks immediate counterplay on the queenside. Also possible are the developing 7…Be7 and 7…Nbd7, planning …Nc5 which will attack the bishop and put extra pressure on the e4-pawn.
8.0-0 Be7 9.Qf3
This is very much the modern way for White to play, attacking first with pieces rather than looking for a particular pawn break. The more traditional approach is with 9 f4, planning f4-f5, to put pressure on the e6-pawn and try to bring the bishop on b3 to life. Play can continue 9…Bb7 10.f5 e5 11.Nde2 and now 11…Nxe4 12.Nxe4 Bxe4 13.Nc3 Bb7 14.Qg4 gives White excellent compensation for the pawn, so Black should probably be content with 11…Nbd7.
9…Qc7
Black must display caution here as White’s last move contained a threat. For example: 9…0-0? 10 e5! wins material. The most natural move way to deal with this threat is with 9…Bb7, but this allows White to carry out a very effective sacrifice: 10.Bxe6! fxe6 11.Nxe6 Qd7 12.Nxg7+ Kf7 13.Nf5 and White has three very good pawns for
the piece, while Black’s king is in disarray.
TIP: Bxe6 is a trick to look out for in the Fischer Attack. Black’s only other sensible move at this point is 9…Qb6. Both this and 9…Qc7 plan to meet 10 e5? with 10…Bb7!.
10.Qg3
White turns his attentions to Black’s g-pawn.
10…0-0
Black is not forced to protect g7. Another major possibility here is 10…Nc6 11.Nxc6 Qxc6. Now White can grab on g7, but after 12.Qxg7 Rg8 13.Qh6 Nxe4 14.Nxe4 Qxe4 the capture of the crucial e4-pawn is more important and Black stands well. Instead, White normally opts to defend e4 with 12.Re1.
Strategies
From the above diagram White has two main approaches, which can often be combined. The first is simply to attack the kingside with pieces. This will generally not work against a very solid structure, but here White has more chances as his pieces are extremely actively placed. This plan can be supplemented by the positional thrust f2-f4-f5, adding pressure on the e6-pawn. Mter either a capture on f5 or a the advance to …e6-e5, White’s bishop comes to life on b3.
For his part, Black has no weaknesses in his position and if he extinguishes White’s early initiative then he has good chances to exploit his better pawn structure. Black will probably have quite a bit of defending to do, at least to start with, but counterplay can be found on the queenside and against White’s slightly vulnerable e4-pawn.
Theory
It’s especially important for black players to read up on this line as this system is quite unforgiving: one slip and Black could be facing an overwhelming attack. However, theory does state that Black is doing okay (if he knows what he’s doing!).
Statistics
Taking the position after 6…a6 (to include the more common Najdorf move order), this position has been reached over 7,000 times in Mega Database. White scores a below-par 50% and 74% of the games are decisive.
Summary- Key Ideas In The Scheveningen
1) With its solid pawn structure and no weaknesses, the Scheveningen is an ideal choice for those wishing to play from a sound positional basis.
2) The Keres Attack with 6.g4 is without doubt the most dangerous. white system against the Scheveningen and scores well in practice. This has led to many black players to transpose into the Scheveningen via the Najdorf move-order, which avoids the Keres Attack.
3) The English Attack with f2-f3, Be3 and Qd2 is becoming more and more popular and is a relatively straightforward line for White to play. The bonus for white players is that they can adopt the same attacking set-up against both the Najdorf and the Scheveningen, thus reducing the amount of learning time.
4) If White is looking for a more controlled attacking game then the 6.Be2 variation is an ideal choice.