Learn beginner tactics through our free Fundamental Tactics course! Practice your tactics on Hercules Chess’ practice tools by playing rated puzzles and puzzle rush today.
“Tactics thrive in a superior position.” These are the words of the great Garry Kasparov. When you play chess, one of your first plans must be to develop your pieces towards the center of the board. Obeying this chess principle will in turn put you in a strong position to launch some fierce attacks and tactical combinations onto your opponent.
To execute any tactical combination on your opponent, your pieces must be in harmony with one another. This can be achieved by proper development in the opening.
For the average Joe, it can be difficult at times to spot mating patterns, threats, and tactical ideas in the chess game. This is why I’ve composed a list of 10 brutal chess tactics that you can memorize and apply in your games. Ensure you read through all 10 chess tactics as you won’t want to fall for any during your games.
Here are the top 10 chess tactics for beginners:
- Fried liver Tactic
- Piece Sacrifice
- Deflection
- Back Rank Mate
- The Greek Gift
- Discovered Attack
- Removing the defender
- G and H-file checkmate
- Rooks on the 7th rank
- Decoy
(Open the PGNs from the bottom right corner to view the games analysis)
1. Fried Liver Tactic
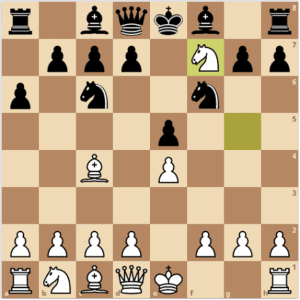
1.e4 e5 2.Nf3 Nc6 3.Bc4 Nf6 4.Ng5
The strange name of this tactic actually comes from an Italian saying “dead as fried liver” which perfectly describes the lethal result of this move if it is played correctly. Just like the Four-Move checkmate, it takes advantage of the weak square on f7.
How to reach the Fried Liver Attack
It’s really very simple to arrive at the Fried Liver Attack. If you are playing White, you start with three sensible developing moves ( e4, Nf3, Bc4 ). If Black now plays Nf6, White can launch the fabulous Fried Liver attack.
It’s vital that Black has played Nf6, otherwise, disaster strikes, because the black Queen can simply chop your Knight off. After the move Ng5, White is threatening Nxf7, capturing a Pawn and forking two of Black’s major pieces – the d8 Queen and the h8 Rook.
Now a common question is, “Why not take on f7 with the Bishop instead of the Knight as shown in the image below?” Some people are tempted to capture with the Bishop because it will put the enemy in check. However, when the King moves out of check, your attack is over and you have only won a Pawn. In contrast, taking with the Knight leads to winning a Rook or a Queen. Would you prefer to be a Pawn or a Rook ahead?
White is just a pawn up
Tips to remember about the Fried Liver:
- Watch for an opportunity to use this effective tactic
- Don’t launch the fried liver if your opponent has not developed his Knight to f6
Defending Against The Fried Liver
If you are playing Black in this game, you have a simple defense. After White has played Ng5, Black should reply with Pawn to d5. White will normally capture this with his e4 Pawn, after which your best move is Na5, which will force the white c4 Bishop off the diagonal where he is waiting to back up the attacking Knight on g5.
Success is 100% guaranteed when you first learn the Fried Liver trap. The Knight on f7 is now attacking pieces and Black only has time to save one. Note that the c4 Bishop is backing up the Knight’s position.
2. Sacrifices
Some chess sacrifices can be very brutal. A chess sacrifice can be described as a deliberate loss of material in return for an expected advantage. When you start playing chess, you are always aware of the points value of your pieces. In some very specific circumstances, however, it can be in your best interest to “sacrifice” or give away a piece. It’s important to remember that chess is about checkmating your opponent’s King, not hoarding pieces.
There are two main types of sacrifices in chess:
- Positional Sacrifice: A piece sacrifice made to achieve long term positional advantage.
- Tactical Sacrifice: A piece sacrifice made to achieve a clear winning position (material gain or checkmate)
Let’s take a look at a few examples
An Opening Gambit (Pawn Sacrifices)
The Danish Gambit is a well-known opening, which includes the sacrifice of two Pawns. This would fall under the category of Positional Sacrifice since White is aiming for the long-term activity of his pieces. The mainline of the Danish Gambit is 1.e4 e5 2.d4 exd4 3.c3 dxc3 4.Bc4 cxb2 5.Bxb2 If you play these moves on your board at home, you will reach the position shown.
Although White has given away two pawns, he has developed both Bishops and has good control over the center of the board, whereas Black has lost just one Pawn but the rest of his pieces remain on their starting squares.
Checkmating Sacrifice (Smothered Mate)
Smother means to take away air from something by covering it, like putting a blanket over fire. In chess a smothered is when a Knight checks a King who is completely surrounded by his own pieces. To force this kind of mate, we often give up a Queen!
The standard combination of the Smothered Mate begins 1.Qd5+ Kh8 2.Nf7+ Kg8. Next is double check by 3. Nh6+! Kh8 and then a crown-pleasing Queen sacrifice! 4.Qg8+ Rxg8 5.Nf7#(1…Kf8 2.Qf7#)
This is a great example of a checkmating sacrifice and you should always be mindful of this tactic. White gives up his Queen in order to deliver a brilliant mate with his one remaining piece. White plays Qg8+, which forces Rxg8.
Now that the Queen has diverted the black Rook with self-sacrifice, the white Knight can safely deliver checkmate on f7.
Anastasia’s Mate (Queen Sacrifice)
Another checkmating sacrifice is known as Anastasia’s checkmate. Here, the h5 Queen, the e7 Knight, and the e4 Rook are involved. White performs the daring sacrifice Qxh7+ when Black’s only option is to recapture the Queen with his King. Then Rh4+ is actually checkmate because the King has been trapped by the Rook and the Knight.
The Rook is vital in this checkmate. Once the Queen has been captured, he can move to h4 and checkmate the enemy King.
Related Post: 6 ways to attack the king
Defensive Sacrifice
Sometimes the odds are against you and a clever defensive sacrifice is all you need to narrowly escape the enemy threat.
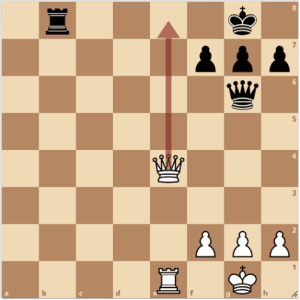
It’s Black to move. Here, white is threatening three different checkmates: Qe7, Qf7, and Qh8#. The situation looks hopeless for Black, but Rd6+ saves the game! If the white King captures the Rook, the black King is not in check but has no legal moves.
It is a stalemate. The Rook’s move forces the white King to capture it and ends the game in a stalemate. If the white King moves out of check, then the black Rook can gleefully take the Queen and the game is drawn, through a lack of mating material.
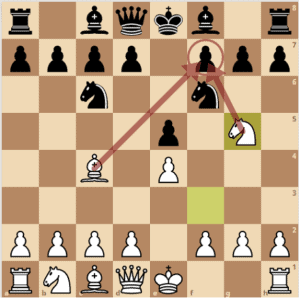
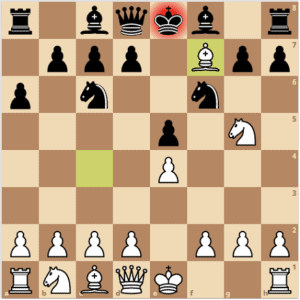
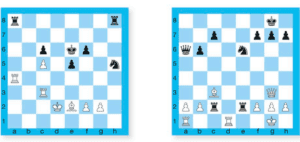
3. Deflection
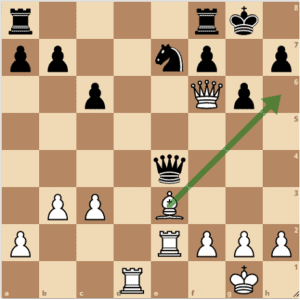
Deflection is a cleverly known chess tactic that occurs when you distract a piece away from defending another piece or square. There are two different types of deflection shown here.
The first example is a material-winning deflection where White will gain points from Black. The second board demonstrates a cunning checkmating solution that will win White the game.
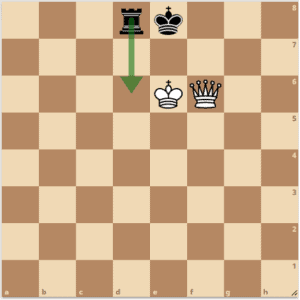
4. Back Rank Threats
In chess, a rank is a row of squares across the board. Your back rank is the row on which you place your King at the start of the game. Watch out! A great many checkmates are delivered on the back rank on the board. A bank rank is said to be weak if none of the pawns in front of the castled King have moved. There is a risk that he will get trapped behind them. Sometimes we can use sacrifices against the pieces that defend the back row.
Don’t Get Trapped like this white King!
When you castle it’s good to keep your King safe behind a wall of pawns. Here, however, the pawns have become a death trap for the white King. It is checkmate and the King cannot escape. He has no pieces defending the back rank. The black Rook has successfully checkmated the King because he is trapped by his pawns.
The Escape Square (Avoiding the trap)
Moving the h- Pawn forward is a great way to allow the white King an escape square. It is therefore not checkmate and the game can continue.
This time the black Rook cannot deliver checkmate because the King can escape from the back-rank to the h2 square.
Back Rank Blunders
Back rank checkmates can either be delivered by Queen or Rook and can occur at any time during the game. So you should always be aware of the serious threat of checkmate known as a submarine or back rank checkmate (even if you think you’ve got it covered). Sometimes your opponent can cunningly block off your escape route!
Sacrifices along the Back rank
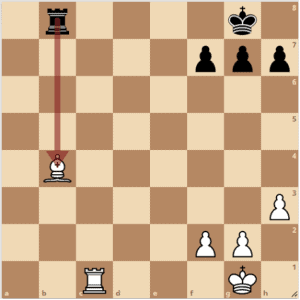
If you can checkmate your opponent, does it matter that they capture your Queen in the process? Of course not! Here White thinks ahead and forces the black b8 Rook to capture his Queen so he can give a back-rank checkmate by recapturing with his Rook.
The white Rook backs up the Queen and is able to recapture the black Rook and deliver checkmate.
Don’t Get Deflected
It is crucial that your pieces are not deflected away from their defense of the back rank. Here, it would be a catastrophe if the black Rook was tempted to capture the seemingly loose Bishop because White could then deliver an immediate checkmate with the c1 Rook.
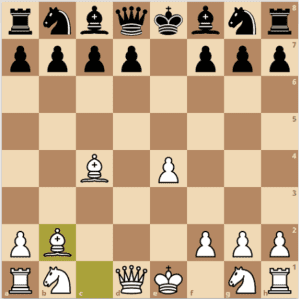
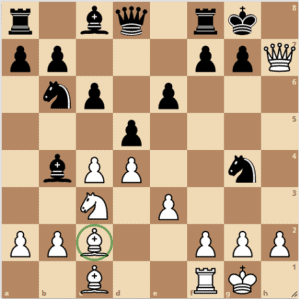
5. The Greek Gift
The Greek gift is a chess sacrifice that is frequently deadly. It refers to the tale of Troy, in which the Greek army left a giant wooden horse outside the gates of the city of Troy. Thinking it was a gift from the gods, the Trojans took the horse into their city and the Greeks then launched their surprise attack.
There are a few steps to successfully execute the Greek Gift sacrifice.
Removing the defender: White’s first task is to remove the defender of the black Kingside, the f6 Knight. Unless he wants to be captured by the e5 pawn, the Knight is forced to move Nd5.
Offer the gift: Now White offers the Greek Gift and sacrifices a Bishop for the Pawn on h7 (Bxh7+). If the black King accepts the gift, then the race to checkmate him is on.
Maintain the Attack: White is a Bishop down and therefore vulnerable, so he has to move quickly and attack before the black King realizes his plan.
Black Retreats: White moves his Knight to g5 and the black King hurriedly retreats behind his pawns where he thinks he will be safe (Kg8).
The Queen Arrives: The Queen has come to join the fun (Qh5). In just a few moves, the position has changed dramatically. White is now threatening Qh7 checkmate and Black must struggle to survive.
Black gets desperate: In an attempt to stay in the game, Black has chopped off the white g5 Knight (Bxg5). White now has a choice of three different recaptures. Qxg5, hxg5, or Bxg5.
Bring in the Backup: White recaptures with the h-pawn (hxg5). The h1 Rook is now backing up the Queen’s h7 and h8 attacks. Black’s only hope of survival is to move his f7 Pawn to f5 to create an escape square for his King.
Checkmate: To block off the black King’s last chance of escape, White advances his g-Pawn to g6, Black is now powerless to prevent the checkmate.
6. Discovered Attacks
The discovered attack is a common tactic that occurs when one piece moves away and uncovers an attack from another piece behind it. The piece that moves away usually sacrifices itself with a check. When you hit your opponent with a discovered attack, it is as if you have ambushed them. One of your own soldiers leaps out of the way to reveal that an attacking piece has been craftily hiding behind him all along.
Double Discovered Attack
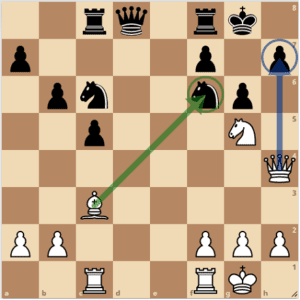
The piece that leaps out of the way is often able to pose a threat itself. Here, Bh6 discovers a near-fatal attack on the Black position. White threatens both Qg7 checkmate and the capture of the black Queen by the Rook on e2. Black cannot halt both these threats and must immediately lose his Queen or game.
Double Discovered Attack with Check
Double discovered attacks often involve discovered checks. Bishop to b5 is a discovered check. It reveals a powerful attack on the undefended black Queen by the white Queen. Black must get out of check, after which white will simply chop off his Queen. Beware that loose pieces drop off.
Petrov’s defense is a great chess opening to illustrate this tactical idea.
- Here, Black has copied White’s first two moves but now it all starts to go wrong. The white Knight has just captured Black’s e5 Pawn. If Black continues to mirror with Nxe4, his position will fall apart.
Black has moved his Knight and White has now played Qe2. If Black copies again with Qe7, White can capture the black Knight and protect the white Knight on e5. If the black Knight suddenly realizes that things aren’t going his way and retreats to f6, White has a fantastic discovered attack, which wins the black Queen.
Nc6+! This reveals a discovered check on the black King by the white Queen. The Knight on c6 also attacks the black Queen on d8. Black must get out of check immediately, after which his Queen will be captured either on d8 or e7 when she blocks the check.
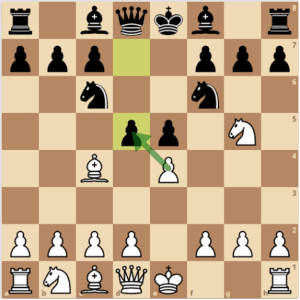
7. Removing The Defender
Removing the defender is a common chess tactic used to win material in chess. Your army is too valuable to leave in unprotected situations. Therefore it is important to keep your pieces defended. There are ways of removing your opponent’s defending men, however, that leave other pieces open to attack.
In the chess game, you can:
- remove the defender of a piece
- remove the defender of the position
- remove the defender of the King.
Let’s look at a few examples
Removing the defender of a piece
Here, the black c6 Knight is defending the d4 Rook. When the white g2 Bishop captures on c6, the black King must escape from check.
Removing The Defender Of a Position
The f6 Knight prevents Re8 check, but here, the c3 Bishop can remove the annoying defender with check (Bxf6+).
Removing The Defender of a King
Without his defensive forces, the King is frequently in serious trouble and here, it will lead to immediate checkmate. The white Bishop takes the defending black f6 Knight with check.
8. G and H file checkmate
It is no exaggeration to say that the powerful Queen gives the majority of checkmates. If your opponent has castled kingside, your Queen’s checkmating attack will usually be launched down the g- or h-files, directly toward the enemy King.
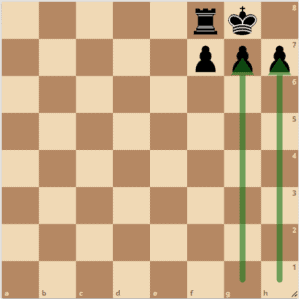
You should attack Black down these files. The f-file is easier for Black to defend. In this typical castling position, the Rook already defends f7.
Checkmate Along the G and H-file
As you can see, the c2 Bishop is providing the backup the Queen needs to deliver checkmate. Without the backup of the Bishop, the black King could capture the Queen. He can’t capture the Queen now because he would be moving into check.
How To defend against the Queen’s attack along the h-file
The black’s Knight is fiercely defending his King while the Queen’s plan to checkmate the black King is foiled.

Checkmate Along the G-file
Now that the g-file defense has been removed, the white Queen can play Qxg7 checkmate, while the white Rook on g3 provides vital backup.
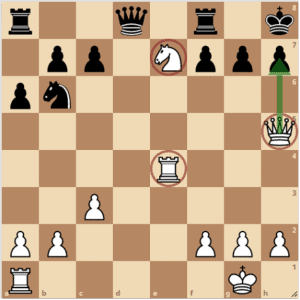
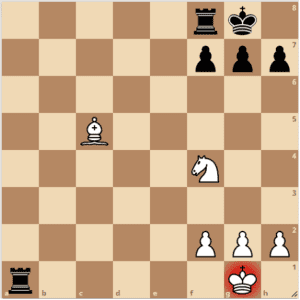
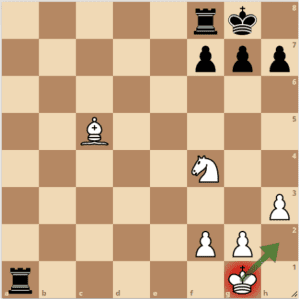
9. Rooks on the 7th Rank ( Seventh Heaven)
Rook are usually glad when pawns and pieces gets traded. That’s because the Rooks grow stronger as the opposition becomes more “open”. The favorite place for a Rook to be is on the seventh 7th rank. Sometimes its worth sacking a pawn to get a Rook on the seventh rank. The ultimate fun for Rooks is when they are both on the seventh rank!
Let’s look at how double Rooks on the 7th rank can lead to nasty tactics and mating threats. In this diagram, black to play has a typical mate in 3. 1…Rxg2 2.Kh1 Rxg2+ 3.Kg1 Rdg2#
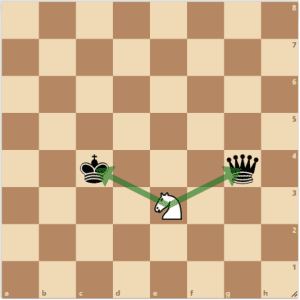
10. Decoy
A decoy in chess is a sacrifice that makes the opponent move a piece to a square where it helps us. This often results in the gain of material. In the diagram below, white would love to pick up the black Queen. He could do so by forking the black King and Queen if the king were in the corner.
Rh8+! decoys the black King into the corner, where after 1…Kxh8, the Knight picks off the Queen. 2.Nxf7+ Kg8 3.Nxg5. If its Black to play, then he can decoy the white King with the fancy move, 1…Qc1+! Kxc1 followed by mate on a1 (Ra1#)
Other Common Chess Tactics (Forks, Pins and Skewers)
Forks, pins, and skewers are some of the sneakiest tricks you can use against your opponent. These tactics can lead to winning one, and sometimes several, enemy pieces. Your tactical ability is important in your strength as a player because ultimately tactics will lead to winning the game.
Forks
Where one piece attacks two or more pieces at the same time it is called a fork. When you fork pieces it can be difficult for your opponent to defend all their men. Every piece on the board can fork, even the Pawns.
Diagram showing Knight forking King and Queen
Pins
Another effective tactic is the pin. It is an attack on a piece which, if it tries to move, leaves a more valuable piece open to capture. Sometimes this can leave the opponent completely paralyzed. The pinned piece is forced to stay where it is until the attacking piece moves or is captured.
The white Bishop is pinning the black Rook to the black King. Meanwhile the white Rook on g2 is pinning the Knight to the Queen. Black seems completely immobilized.
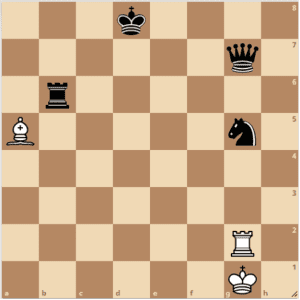
Skewers
A skewer is also known as an X-ray. Its a move that attacks two pieces along the same line. After the first piece moves away, the one behind it is taken
The white c8 Rook is skewering the black King and h8 Rook. The checked King will have to move after which the h8 Rook will be captured
Conclusion
These chess tactics are commonly played at all level of chess. Being able to spot these threats is a great way to win most of your games and also to avoid making mistakes that can cost you the game. The more you solve these chess tactics, is the better your calculations skills become. You will also develop your imagination in chess and easily recognize mating patterns.
Remember, great things only come from hours of practice. If you should do at least 5 puzzles per day, you will significantly develop your attacking skills in a couple of months. Hope you learned a thing or two from these 10 brutal chess tactics. Cheers 🙂